
Note: Before you go ahead and install Windows 11 on your PC or laptop, we would like to make it clear that this is a leaked Windows 11 build. The Windows 11 build #21996 linked below does not officially come from Microsoft. It does not include all of the rumored new features, could be riddled with bugs, and render your computer unusable if not installed properly. So, we suggest you proceed with caution and install this leaked Windows 11 build on a secondary device if possible.
First of all, download the leaked ISO image of Windows 11 right here. We have used this ISO file to install Windows 11 in this article. If the link is not working, you can use this mirror link to download the Windows 11 ISO image.
Since the previous download links for the Windows 11 ISO image are no longer live, you can rely on these mirror links to get the leaked build. But do note that Google Drive also has a daily download limit, and the links may not work at all times. So you can choose to bookmark this article and return tomorrow, when the data limit resets, to download the leaked Windows 11 build:
Keep in mind that the leaked build is a 64-bit ISO image, so you won’t be able to install Windows 11 on your 32-bit Windows PC as of now.
Install Windows 11 on Any Laptop, PC (Simplest Method)
If you have a newer laptop or PC and Windows 10 is already activated on your computer, then this is the simplest way you can install Windows 11. Having said that, keep in mind, I can’t guarantee that you will get updates once Windows 11 goes live officially. You may have to install the official builds manually. Also, this process takes a bit more time in comparison to other bootable methods, but it’s pretty seamless.
Another good thing is that you can seamlessly switch back to Windows 10 in case you find Windows 11 buggy. Finally, if you get any error, including “This PC can’t run Windows 11” or anything related to TPM, Secure Boot, jump to the next method for an alternate method.
1. As you have already downloaded the Windows 11 ISO image from the above link, it’s time to put the show into action. Right-click on the ISO image and click on “Mount“.

2. Next, the ISO image will load as a DVD drive. Open it and double-click on “setup“.

3. A Windows 11 installer will open up. Click on “Next“.
Note: If you get “This PC can’t run Windows 11” or “The PC must support TPM 2.0” error, move to the next section for a solution.


7. Finally, click on “Install“, and it will start the Windows 11 installation process. It will take considerable time, so keep patience. During the process, your machine will restart and apply the update again.

8. Once the update is done, you will be greeted with the new startup sound and login screen. Enter the same PIN or password that you had on your Windows 10 setup and hit enter. Voila, Windows 11 will be live on your PC with your license, apps, files, and everything intact.

This section is for all those users who were unable to install Windows 11 from the first method due to the TPM error. Don’t worry, you need to make one change, and you will be off to the same installation path. Here is how to go about it.
1. You need to download a small appraiserres.dll file. Just click Here and download the ZIP file. After that, extract the ZIP file to get the DLL file.


3. Next, create a “Windows 11” folder on the desktop.

4. After that, open the Windows 11 folder and paste everything (Ctrl +V) you copied from the Windows 11 ISO image.

5. Next, copy the DLL file.


7. Open the Windows 11 folder and double-click on “setup“, and this time, you won’t face any errors.

8. Follow the instructions mentioned in the above section and continue. The Windows 11 installation process will now start on your laptop or PC without any issue.


This method is for those users who are well-aware of partitioning, BIOS/ UEFI, GPT/ MBR schemes, creating bootable USB drives, and more. Basically, if you have installed Windows 10 on a machine before, this guide is for you. This tutorial will also help those who don’t have an activation key for Windows or those who want to create a dual-boot system along with Windows 10. Now having said all of that, let’s begin.
1. First off, we need to flash the ISO image on a thumb drive. Make sure you have a USB thumb drive with at least 16GB of storage space. Now, go ahead and download Rufus (Free). You can check out Rufus alternatives if you need another software to create the bootable installer drive.
2. Next, launch Rufus and click on “SELECT” and choose the Windows 11 ISO image. Make sure the USB thumb drive is selected in the “Device” drop-down menu. After that, keep everything as default and click on the “START” button.

3. Now, go through the initial on-screen instructions and let Rufus flash Windows 11 on the USB drive.
4. Once the process is done, plug the USB drive on the PC where you want to install Windows 11. If you want to install Windows 11 on the same PC, keep the USB stick plugged in. After that, restart your computer.
4. Next, press the boot key continuously while your computer boots up. It will allow you to select the Boot device. For HP laptops, it’s the Esc or F9 key. You can look for the boot key for your laptop/ PC from the internet. It should be one of these: F9, Esc, F12, F10, etc.

5. From the Boot device options, select the USB thumb drive on which you just flashed the leaked Windows 11 build. Choose the one that has UEFI written next to your USB stick. If there is no UEFI mention, don’t worry, simply choose the USB drive

6. Finally, the Windows 11 installer will start. In rare cases, you might see an initial prompt asking whether you want to continue the upgrade or clean install Windows 11. Click on “No” to clean install Windows 11. Don’t worry, this will not erase all your data.

7. Now, the setup process is similar to how we install Windows 10. Simply choose “Install Now -> I don’t have a product key -> Select Windows 11 edition -> Custom.”
If you see Windows 10 editions instead of Windows 11, don’t worry, move on with the installation. You will have Windows 11 by the end of the installation.
Note: If you get “The PC can’t run Windows 11” error, then move to the next section to find the solution.

8. Here, select the partition on which you want to install Windows 11. After that, the Windows 11 installation process will start on your PC.

9. Soon, your PC will restart, and a new Windows 11 OOBE setup screen will appear. You can now unplug the USB stick. Go through the on-screen instructions and sign in with your Microsoft account. You can also create an offline account if you want.


Troubleshoot Windows 11 Installation (Advanced Users)
1. We need to swap some files from Windows 10 so that Windows 11 gets installed without the TPM requirement. Click on this link and download the latest Windows 10 ISO image from Microsoft’s website. I used the Windows 10 May 2021 build, so I will recommend that. By the way, you can also use Windows 10 Media Creation Tool to download the ISO image.
2. Once you have downloaded the Windows 10 ISO image, right-click on it and select “Mount”.

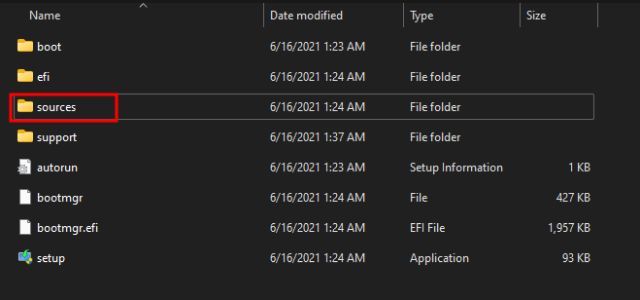
3. The ISO image will be mounted as a drive. Now, move to the mounted drive and open the “Sources” folder.

4. Here, select all the files except for “install.wim” or “install.esd“. Now, press “Ctrl+C” to copy the files. Repeating again, make sure “install.wim” or “install.esd” is not selected when you copy the files.

5. Now, plug the USB thumb drive on which you had flashed Windows 11. Open the USB drive and move to the same “Sources” folder.


Run Windows 11 On Your Computer Without Any Issue
So that is how you can download the Windows 11 ISO image and get Windows 11 up and running on your laptop or desktop without any issue. I suggest you follow the instructions step by step, and you will have Windows 11 installed in no time. Anyway, that is all from us. If you are facing any issues, comment down below and let us know. We will help you out with any Windows 11 installation woes.


No comments:
Post a Comment